EXAM REVIEW
WED 5/31 - Jeopardy Team Questions
- One team member should create a new Google Doc and title it as the theme for your Jeopardy board
- Share it with all of your team members (student#@hcps.us) and with me ([email protected])
- Type out the separate category headings
- Each person must submit one question beneath each heading (place your initials next to the question you created)
- There can be NO repeat questions (rewrite them together)
- Each question should be in the form of an extended answer and a response that states, "What is....?" - like JEOPARDY!!
- When all questions are complete, review them together and re-order the questions from easiest to the most difficult
- The top 5 questions from each category will be chosen from each category to build the Jeopardy boards
TEAM 1 & 4: The Camera & Film Processing (TITLE)
TEAM 1 - Edit - password = team1
TEAM 1 - Play
TEAM 4 - Edit - password = team4
TEAM 4 - Play
CATEGORIES:
TEAM 2 & 5: The Darkroom & Print Developing (TITLE)
TEAM 2 - Edit - password = team2
TEAM 2 - Play
TEAM 5 - Edit - password = team5
TEAM 5 - Play
CATEGORIES:
TEAM 3 & 6: Alternative Processes & Art Criticism (TITLE)
TEAM 3 - Edit - password = team3
TEAM 3 - Play
TEAM 6 -Edit - password = team6
TEAM 6 -Play
CATEGORIES:
JEOPARDY GAME BUILDING INSTRUCTIONS
TEAM 1 - Edit - password = team1
TEAM 1 - Play
TEAM 4 - Edit - password = team4
TEAM 4 - Play
CATEGORIES:
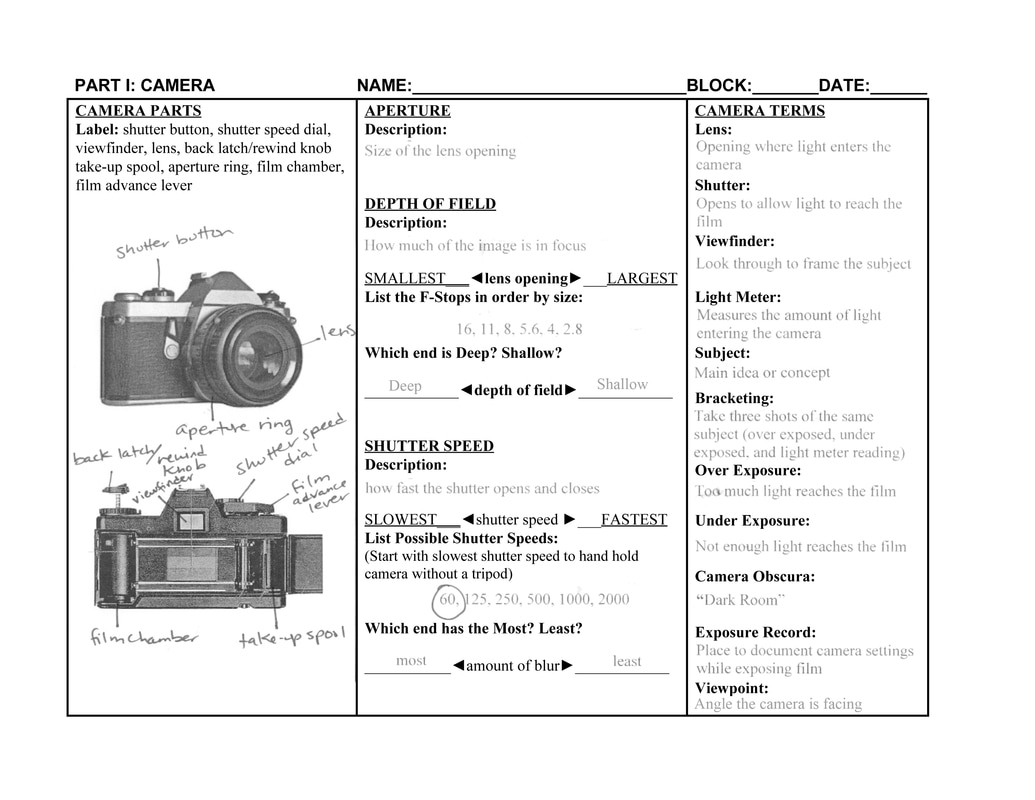
- Camera Parts
- Shutter, Shutter Release Button, Viewfinder, Lens, Take-up Spool, Film Chamber, Light Meter, Back Latch, Film Advance Lever, Film Rewind Knob, Shutter Speed Dial
- Exposure Control
- Aperture, F-Stops & Depth of Field (Great & Shallow), Shutter Speed, Camera Blur, Bracketing, Middle Grey, Underexposure, Overexposure Shot Record Film Speed & Film Grain
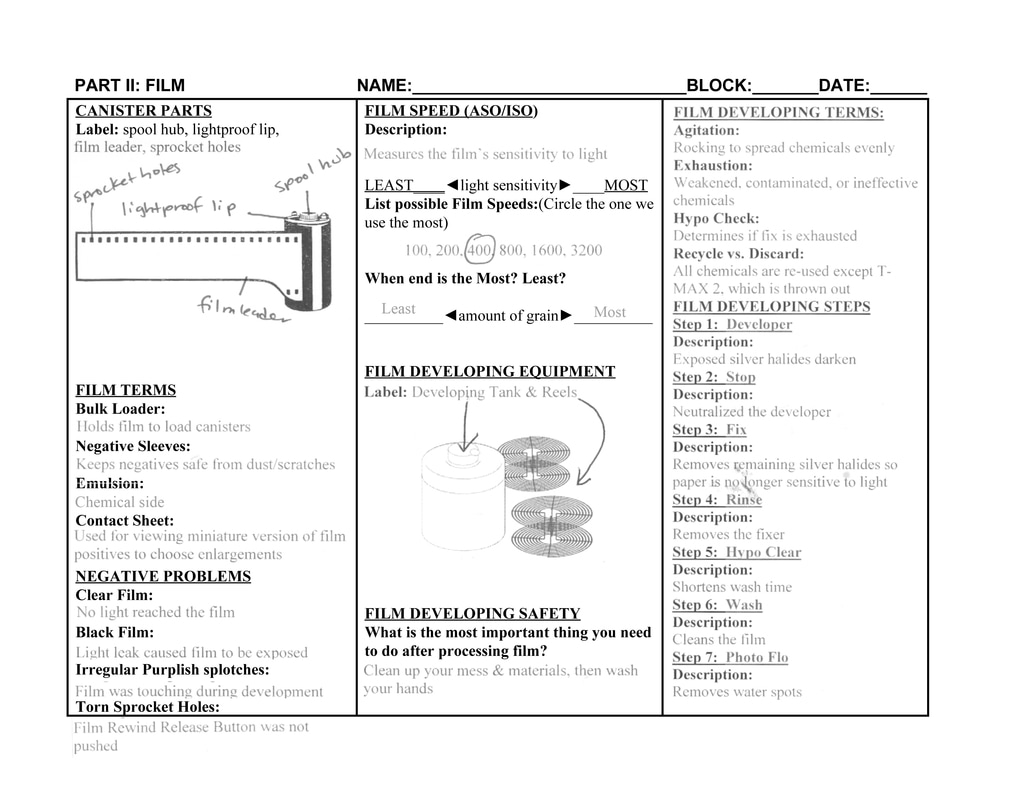
- Canister Parts
- Spool, Spool Hub, Light Proof Lip, Film Leader, Bulk Loader, Sprocket Holes
- Film Processing Terms
- Developing Tanks & Reels, Agitation, Exhaustion, Recycle/Discard, Safety
- Film Processing Steps
- T-MAX 1, T-MAX 2 Stop, Fix, Hypo Check, Hypo Clear, Photoflow
TEAM 2 & 5: The Darkroom & Print Developing (TITLE)
TEAM 2 - Edit - password = team2
TEAM 2 - Play
TEAM 5 - Edit - password = team5
TEAM 5 - Play
CATEGORIES:
- Problem Negatives
- Clear Film, Black Film, Torn Sprocket Holes, Purple Splotches, Overexposure & Underexposure
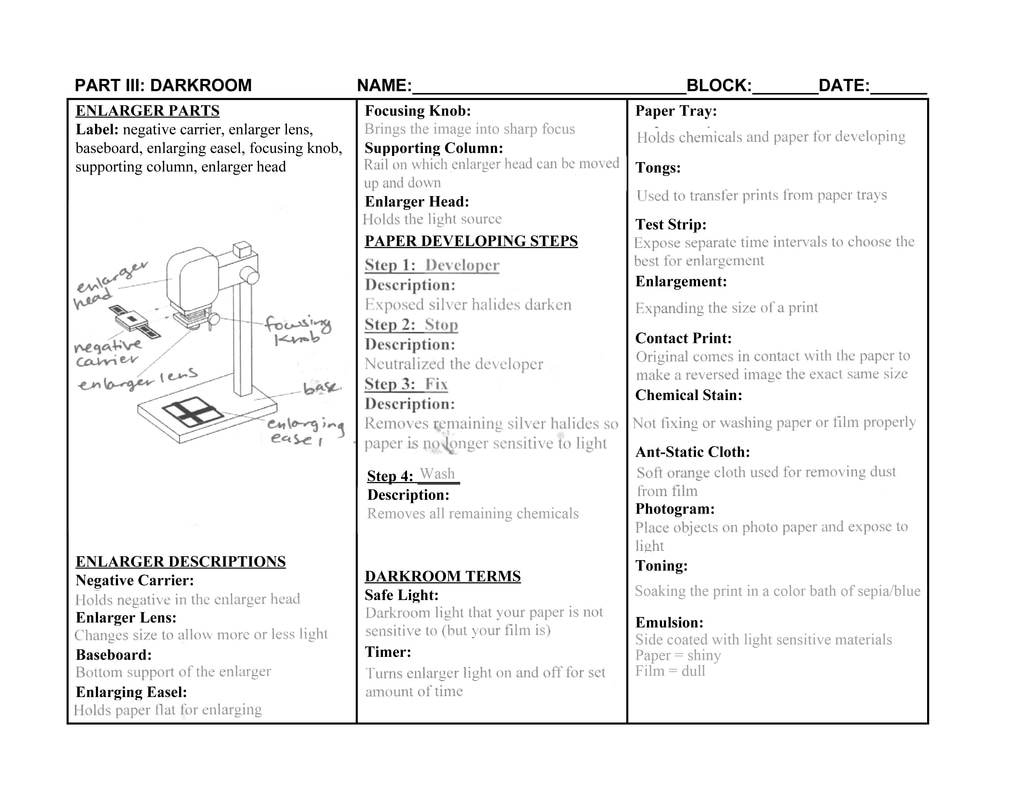
- Enlarger Parts
- Negative Carrier, Enlarger Head, Baseboard, Focusing Knob, Elevation Control, Enlarger Lens, Enlarging Easel, Supporting Column, Timer
- Paper Developing Terms
- Negative Sleeves, Contact Sheets, Test Strips, Agitation, Exhaustion, Safety, Chemical Stain
- Paper Developing Steps
- Developer, Stop, Fix, Wash
- Darkroom Terms
- Safelight, Timer, Tongs, Antistatic Cloth, Emulsion, Silver Halides
TEAM 3 & 6: Alternative Processes & Art Criticism (TITLE)
TEAM 3 - Edit - password = team3
TEAM 3 - Play
TEAM 6 -Edit - password = team6
TEAM 6 -Play
CATEGORIES:
- Alternative Processes
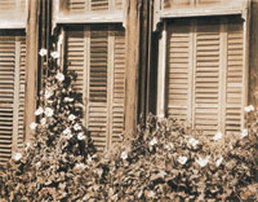
- Camera Obscura, Photograms, Contact Prints, Toning, Hand Tinting, Sabattier, Panorama
- Compositional Techniques
- Subject, Subject Distance, Bird's Eye/Worm's Eye View, Framing, Rule of Thirds
- Elements of Design
- Line, Implied Line, Shape (Organic & Geometric), Space, Value, Texture, Form
- Principles of Design
- Balance (Symmetrical & Asymmetrical), Contrast, Emphasis, Focal Point, Rhythm, Pattern, Repetition Unity
- Steps of Art Criticism
- Description, Analysis, Interpretation
JEOPARDY GAME BUILDING INSTRUCTIONS
FOURTH NINE WEEKS
Week 1-3
Continue Hand Tinting - Due Friday 4/28!
Roll Film for Panorama Project
Roll Film for Panorama Project


|
|
Week 4
TUE 5/2 - Develop 2 Rolls of Panorama Film
THU 5/4 - 2 Contact Sheets + Exposure Record Outcomes Due
THU 5/4 - 2 Contact Sheets + Exposure Record Outcomes Due
Week 5
MON 5/8 - 2 Mini Panoramas Due (Final Panorma must have a total of at least 6 frames)
WED 5/10 - 2 Enlargements Due
FRI 5/12 - 2 Enlargements Due
WED 5/10 - 2 Enlargements Due
FRI 5/12 - 2 Enlargements Due
Week 6
TUE 5/16 - 2 Enlargements Due
THU 5/18 - FINAL PANORAMA DUE!
THU 5/18 - FINAL PANORAMA DUE!
Week 7
Week 8
Week 9
THIRD NINE WEEKS
Week 1
Sabattier Positive and Negative Prints
|
|
MON 1/30 - Sabattier Notes: Textbook pages 377-379, 382-384
WED 2/1 - Sabattier Print Due
FRI 2/3 - Contact Print Due
WED 2/1 - Sabattier Print Due
FRI 2/3 - Contact Print Due
Week 2
TUE 2/7 - Sabattier Contact Print = Extra Credit (optional)
THU 2/9 - Famous Photographer Selection
A1 Photographer Selections:
Ansel Adams - Dominique Sortwell
Robert Adams - Mackenzie Engel
Bill Brandt - Madison Hultay
Harry Callahan - Andrew Sellers
Julia Margaret Cameron - Nora Mouer
Robert Doisneau - Sveta Lukovtseva
William Eggleston - Mya Goodman
Miton Greene - Beneree Scott
Philip Halsman - Lexi O'Neill
Jacques Henri-Lartique - Olivia Guridy
Andre Kertesz - Lilly Raun
Cindy Sherman - Laura Mick
Sally Mann - Clair Martin
David Muench - Jordan Linklater
Irving Penn - Jaeden Tearne
William Wegman - Olyvia Gaines
Edward Weston - Connor Ash
A2 Photographer Selections:
Ansel Adams - Lauren Johnson
Werner Bischof - Logan Perkins
Christopher Burkette - N'Dyah Harris
Bruno Delbonnel - Connie Lumpkin
Jim Brandenburg - Faith Gitchell
William Christenberry - Kalea Koelling
Imogen Cunningham - Denise Colombani-Garay
William Eggleston - Christine Brotherton
Milton Greene - Mackenzie Berry
Andy Goldsworthy - Autumn Rae
John Gutman - Jessie Anderson
Philip Hyde - Tifani Belcher
Mary Ellen Mark - Karis Adam
Tina Modotti - Riley Bundy
David Muench - Emily Jacob
Elliot Porter - Mary Beth Ratchford
Aaron Siskind - Alyssa Epps
William Wegman - Anna Woodward
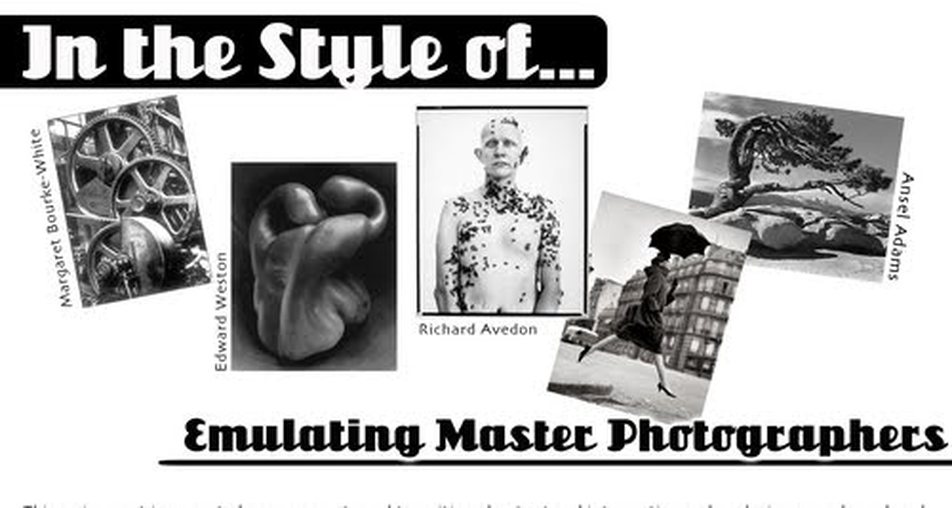
This assignment is a way to become accustomed to writing about art, interpreting and analyzing artwork produced by prominent photographers throughout history. Through this research you will become more familiar with an artist’s style, process, and technique. Each of you will use this research as a source while completing a photo assignment by emulating your photographer’s unique style.
There will be three parts to this project including 1. Written Portion (Google Doc), 2. Presentation (Google Slides), and 3. Shooting assignmen (2 rolls of film + 2 prints). You will have class time to work on the research components, but anything not completed during that time must be done at home. You must sign up and commit to a photographer with Mrs. Fisher. A list of pre-approved photographers can be found here. Anyone not on this list can be discussed individually. You will need to find at least three different sources to reference for your photographer choice. You cannot have the same photographer as anyone else in your class, so view the names that have already been taken above. When you select images from their portfolio to present, please make sure they are school appropriate!!
1. Written Portion:
You must write a paper consisting of 700-1000 words, double-spaced and Arial 12pt font. This works out to be a little over two but no more than three pages, so DON’T PANIC! You must site at least THREE sources included at the bottom of your paper. Don’t limit yourself to just internet sources. See me for photography books or search the library and book stores. Points will be deducted for major grammatical errors and poorly written sentence structure. DON’T PLAIGERIZE OR YOU WILL NOT RECEIVE CREDIT!!
2. Powerpoint Presentation:
Accompanying your paper, you must present a 5-8 minute PowerPoint presentation that includes 10 slides. This time period will be adhered to VERY STRICTLY. Points will be deducted for every minute under or over the time limit. Your presentation should be professional and well prepared. You may choose to reference abbreviated note cards or a printed outline. YOU MAY NOT READ YOUR PAPER OR READ OFF THE SLIDE SHOW.
Digital drop box your presentation on Blackboard, burn it to a CD or save it on a Thumb Drive.
There will be three parts to this project including 1. Written Portion (Google Doc), 2. Presentation (Google Slides), and 3. Shooting assignmen (2 rolls of film + 2 prints). You will have class time to work on the research components, but anything not completed during that time must be done at home. You must sign up and commit to a photographer with Mrs. Fisher. A list of pre-approved photographers can be found here. Anyone not on this list can be discussed individually. You will need to find at least three different sources to reference for your photographer choice. You cannot have the same photographer as anyone else in your class, so view the names that have already been taken above. When you select images from their portfolio to present, please make sure they are school appropriate!!
1. Written Portion:
You must write a paper consisting of 700-1000 words, double-spaced and Arial 12pt font. This works out to be a little over two but no more than three pages, so DON’T PANIC! You must site at least THREE sources included at the bottom of your paper. Don’t limit yourself to just internet sources. See me for photography books or search the library and book stores. Points will be deducted for major grammatical errors and poorly written sentence structure. DON’T PLAIGERIZE OR YOU WILL NOT RECEIVE CREDIT!!
- Part 1: Artist Background. Start with a brief history of your artist. Tell where they grew up, attended school, etc. Try to find as much information as possible about who/what their influences were, and how their work progressed. (avg. 100 words).
- Part 2: Portfolio Critique. You will need to choose 5 different examples from the artist’s portfolio. Start your critique of each image with a detailed description of exactly what you see in the photograph. Then analyze individual design elements (line, shape, form, space, value, texture) and principles (balance, contrast, emphasis, rhythm). Include any observations about how the photograph was taken such as depth of field, subject distance, and point of view. (avg. 500 words).
- Part 3: Synopsis. Explain the overall similarities you observe in your artist’s shooting style including subject matter and compositional techniques. (avg. 100 words).
2. Powerpoint Presentation:
Accompanying your paper, you must present a 5-8 minute PowerPoint presentation that includes 10 slides. This time period will be adhered to VERY STRICTLY. Points will be deducted for every minute under or over the time limit. Your presentation should be professional and well prepared. You may choose to reference abbreviated note cards or a printed outline. YOU MAY NOT READ YOUR PAPER OR READ OFF THE SLIDE SHOW.
Digital drop box your presentation on Blackboard, burn it to a CD or save it on a Thumb Drive.
- Part 1: Artist Background. Include information about the artist on the first few slides, but use bullet points and KEEP IT BRIEF. Too much information will be hard to follow. You may include any corresponding images, but do not overwhelm the viewer with too much on one slide. (3 slides).
- Part 2: Body of Work. This should consist of approximately 6 images of their work. Remember you will need to describe analyze, and interpret each image. You will have approximately one minute to talk about each one. Make sure you save high resolution images to bring them into PowerPoint so they are not too blurry. Please only put ONE IMAGE PER SLIDE. Include titles and dates if they are available for each image. (5 slides).
- Part 3: Synopsis. This slide is important for you to demonstrate your understanding of your photographer’s style. This will determine exactly how you will be shooting. (1 slide).
- Bibliography: Include a list of all sources referenced (You are required to have three or more!). (1 slide).
| art_criticism_handout.pdf |
Grading Rubric
Written Portion _____/50pts
PowerPoint Presentation _____/50pts
Written Portion _____/50pts
- Background Information (10pts)
- Image Critiques (10pts)
- Synopsis (10pts)
- Grammar (10pts)
- Sentence Structure (10pts)
PowerPoint Presentation _____/50pts
- Visuals:
- Information & Image Quality (10pts)
- Orderliness & Legibility (10pts)
- Delivery & Preparation:
- Voice Projection & Pacing (10pts)
- Organization & Thoroughness(10pts)
- Three Cited Sources (10pts)
Week 3
MON 2/13 - Research Portion (Progress checkpoint: background + 1 critique) - Roll film
WED 2/15 - Research Portion (Progress checkpoint: 3 more critiques) - Roll film
FRI 2/17 - Research Portion (Progress checkpoint: final critique + synopsis) - Roll film
HW: Shoot two rolls of film in the same style as your selected photographer (Due next Wednesday)
WED 2/15 - Research Portion (Progress checkpoint: 3 more critiques) - Roll film
FRI 2/17 - Research Portion (Progress checkpoint: final critique + synopsis) - Roll film
HW: Shoot two rolls of film in the same style as your selected photographer (Due next Wednesday)
Week 4
WED 2/22 - Develop 2 rolls of film
FRI 2/24 - Turn in 2 contact sheets + exposure record outcomes
FRI 2/24 - Turn in 2 contact sheets + exposure record outcomes
Week 5
Famous Photographer enlargements due (2 8x10's)
Week 6
Famous Photographer Presentations
Roll film (2 rolls)
Roll film (2 rolls)
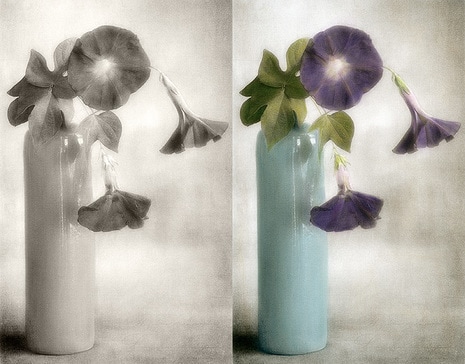
Hand Tinting
|
Week 7Develop Hand Tinting Film (2 rolls)
Turn in Hand Tinting Questions Bring Cotton Balls & Q-tips Week 8Turn in Contact Sheets & Exposure Record Outcomes
Print Color Reference 2 Test Strips Due + 1 8x10 Enlargement (on fiber-base paper) Correct Hand Tinting Questions (see answers below) Week 9Review Color Wheel and Color Theory
Setup Print, Palette, & Reference for Hand Tinting Practice mixing & applying paint on large test strip |
History and Development:
- When did people start hand tinting photographs? - In the early 1800's
- What tones should you look for when choosing a suitable print for hand tinting? Why? - very few solid black areas because the colors does not show in the same way as colors applied to lighter areas - print the image slightly lighter to acheive more saturated color
- Can hand tinting improve the Quality of the original print? Why or Why not? - no, because the effect of coloring a print cannot do anything substantial to enliven or improve the composition of the photo
- What type of image should be used? Why? - use a image that motivates you because hand tinting requires a lot of hard work and dedication
- What kind of photo paper should and should not be used for hand tinting? Why or why not? -Fiber Base paper should be used for hand tinting because it absorbs the paint - Resin Coated paper has a thin plastic coating on top of which the paint sits and will not dry
- Why would it be beneficial to tone the print before hand tinting? - because it would give the print a warm-base and it’s easier to work up color a stark black and white images
- Why is it necessary to have a clean workspace? - the paint can be very messy - it spreads easily and stains any surface
- What can you do to keep it clean? - start with a large piece of white paper to adhere your print, color palette, and reference - keep area clean by throwing out used cotton balls and q-tips - constantly clean hands and table
- What type of coloring effect works best? Superficial or Naturalistic? Explain.- blend naturalistic colors to achieve realistic effects
- What are warm colors and where should they be applied on the print? Why?- red, yellow, orange - place warm colors in the foreground
- What are cool colors and where should they be applied on the print? Why?- green, blue, violet - place cool colors in the background
- What types of colors should be applied in shadow areas?- complimentary colors (opposites on the color wheel)
- Why should mixing black and white be avoided? - the black and white values are already in your print
- What should be done to achieve darker colors? Lighter colors?- add a very small quantity of color to an area to keep it light, or slowly build up several layers of colors until it darkens.
- Will the oils cover up the original tones of the print? yes or no? - the paint is blended into the surface and the original tonal ranges of the photograph show through
- How is color built up on the print? - builds up very gradually and requires several layers to achieve a naturalistic feel
- How much paint should be used on the mixing palette?- very small quantities
- Why should paints be mixed and not used straight from the tube?- it will make your colors look more natural
- Which areas of the print should be tinted first?- larger areas
- What material should you use to pick up the color and apply it to the print?- use a Q- tip and press lightly on the print
- What material should be used to smooth out the color?- a cotton ball
- Should you tint the lightest values or darkest values first? Explain. - lightest because it builds up slowly (you can always make a light painted area darker, but you can't make a dark painted area lighter)
- What is the name of the solution used to wipe out a color?- Extender is a thinning solution
- What material can you use to get the smaller details?- a tooth pick
- How long does it take the oils to dry?- 24 hours
- In what circumstance would you want to wait for the oils to dry before applying again?- if you’re adding color to a large background area and then building a different color over top to fill in the details
13 . Why should P.M. solution be avoided?- contains hazardous chemicals
SECOND NINE WEEKS
Week 1
WED 11/9 - Depth of Field Film #2 Due
FRI 11/11 - Depth of Field Contact Sheet #2 Due + Exposure Record Outcomes
FRI 11/11 - Depth of Field Contact Sheet #2 Due + Exposure Record Outcomes
Week 2
TUE 11/15 - Enlargement #2 Due
THU 11/17 - DEPTH OF FIELD ASSIGNMENT RUBRIC DUE!
THU 11/17 - DEPTH OF FIELD ASSIGNMENT RUBRIC DUE!
Week 3
MON 11/21 - Bracketing Notes Due
Load 2 film cassettes - FILM DUE MONDAY 11/28
Load 2 film cassettes - FILM DUE MONDAY 11/28
Week 4
MON 11/28 - Develop 2 rolls of film
WED 11/30 - 2 Contact Sheets Due + Exposure Record Outcomes
FRI 12/2 - Enlargement #1 Due
WED 11/30 - 2 Contact Sheets Due + Exposure Record Outcomes
FRI 12/2 - Enlargement #1 Due
Week 5
TUE 12/6 - Enlargement #2 Due
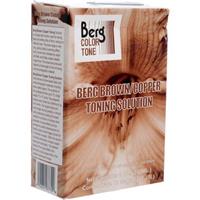
THU 12/8 - TONING ROUND 1: 2 toned test strips due
THU 12/8 - TONING ROUND 1: 2 toned test strips due
|
|
|
|
Week 6
MON 12/12 - TONING ROUND 1: 1st toned 8x10 print due
WED 12/14 - TONING ROUND 2: 2 toned test strips due
FRI 12/16 - TONING ROUND 2: 2nd 8x10 toned print due
Roll Film for next assignment (due when we return from break)
WED 12/14 - TONING ROUND 2: 2 toned test strips due
FRI 12/16 - TONING ROUND 2: 2nd 8x10 toned print due
Roll Film for next assignment (due when we return from break)
Week 7
TUE 1/3 - Develop 2 rolls of film
THU 1/5 - 2 Contact Sheets Due + Exposure Record Outcomes
THU 1/5 - 2 Contact Sheets Due + Exposure Record Outcomes
Week 8
MON 1/9 - SNOW
WED 1/11 - SNOW
FRI 1/13 - 1st Enlargement Due
WED 1/11 - SNOW
FRI 1/13 - 1st Enlargement Due
Week 9

FIRST NINE WEEKS
Week 1
TUE 9/6
Syllabus, Supplies, and Art Guild/NAHS
HW = Signed Syllabus Art Guild/NAHS fees
THU 9/8
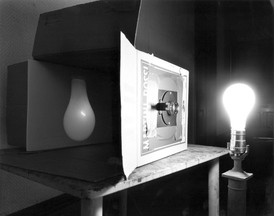
Intorduction to the Camera Obscura & Darkroom Processing
Pinhole Class Photo - Exposure Trial #1/#2
HW = Pinhole Container
The Camera Obscura & The History of Photography
Syllabus, Supplies, and Art Guild/NAHS
HW = Signed Syllabus Art Guild/NAHS fees
THU 9/8
Intorduction to the Camera Obscura & Darkroom Processing
Pinhole Class Photo - Exposure Trial #1/#2
HW = Pinhole Container
The Camera Obscura & The History of Photography
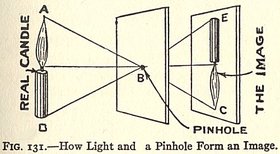
A few centuries before photography was created, people already knew the principles of how light traveling through a tiny pinhole would project an image upside down and backwards. However, no printing was possible at the time because preserving light turned out to be a lot harder task than projecting it. there is a manuscript by an Arabian scholar Hassan ibn Hassan dated 10th century that describes the principles of the camera obscura. It is essentially a dark, closed space in the shape of a box with a hole on one side of it.
|
|
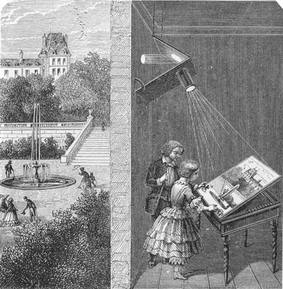
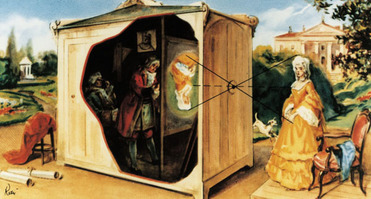
The instrument that people used for projecting pictures was called the camera obscura (which is Latin for the Dark Room). It is believed that the camera obscura was invented around 13-14th centuries. By the 16th century, the camera obscura was used widely by Renaissance artists like Leonardo, Michelangelo, Vermeer. Giovanni Battista della Porta, an Italian scholar, wrote an essay about the camera obscura, which looked very strange and frightening for the people at those times. Eventually he had to drop the idea after he was arrested and prosecuted on a charge of sorcery.
Movies and Short Films for or About Camera Obscura: Girl With the Pearl Earring The Art of Photography: Camera Obscura Camera Obscura |
Later, portable versions were built, followed by smaller and even pocket models. Many painters used these portable tools to help them paint using perfect perspective. Art historians heatedly debate whether painters like Vermeer used camera obscura to achieve remarkably accurate perspective.
|
Week 2
|
MON 9/12
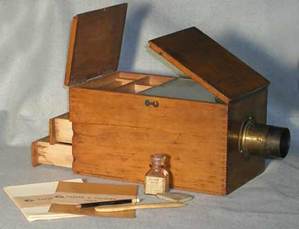
Pinhole Class Photo - Exposure Trial #3/4 Begin Building Pinhole Camera WED 9/14 Review Documenting Pinhole Trials and Paper Developing Steps Classroom Camera Obscura Demonstration Finish Building Pinhole Camera OR Load camera and complete Pinhole Exposure Trial 1 HOW TO MAKE A PINHOLE CAMERA:
|
HOW TO DOCUMENT YOUR PINHOLE TRIALS:
EXPOSURE KEY:Up arrow = Overexposed (too much light) Down Arrow = Underexposed (not enough light) Check = Correct Exposure (black, white, and grey values) X = Light Leak (solid black), O= No Exposure (solid white) Pinhole Negatives - Grading (10pts per Trial): 2pts - Pinhole Negative in To Grade folder 2pts - Pinhole Negative labelled with Name and Trial # 2pts - Trial # written on Work Record 2pts - Shutter Speed written on Work Record 2pts - Exposure Outcome written on Work Record |
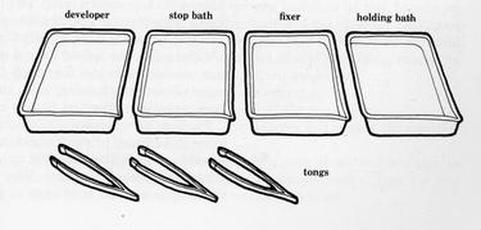
1. Developer: 1 1/2 - 3min (exposed areas begin to darken) 2. Stop: 30 sec (stops the development)
3. Fix: 4 min (removes remaining light sensitive chemicals) 4. Wash: 10 min (cleans the print)
VOCABULARY:
Agitate - rock tray back and forth to spread chemicals evenly
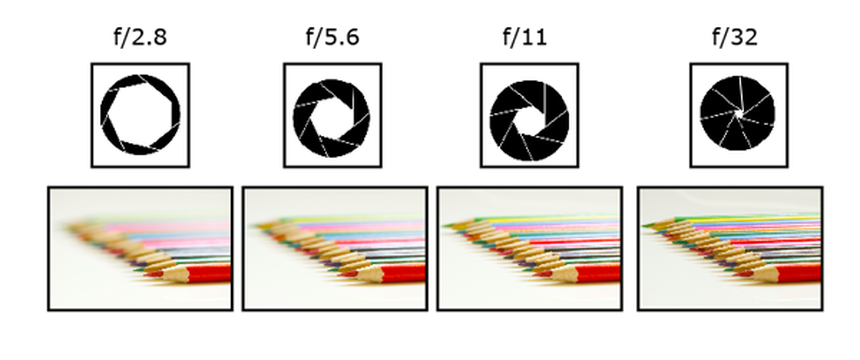
Aperture - size of the lens opening
Shutter Speed - length of exposure time (long exposure = slow shutter speed, short = fast)
Tongs - Used to transfer prints from each tray to avoid contact with skin
3. Fix: 4 min (removes remaining light sensitive chemicals) 4. Wash: 10 min (cleans the print)
VOCABULARY:
Agitate - rock tray back and forth to spread chemicals evenly
Aperture - size of the lens opening
Shutter Speed - length of exposure time (long exposure = slow shutter speed, short = fast)
Tongs - Used to transfer prints from each tray to avoid contact with skin
|
FRI 9/16
Pinhole Exposure Trials 2-3 Explore Contemporary Pinhole Photographers 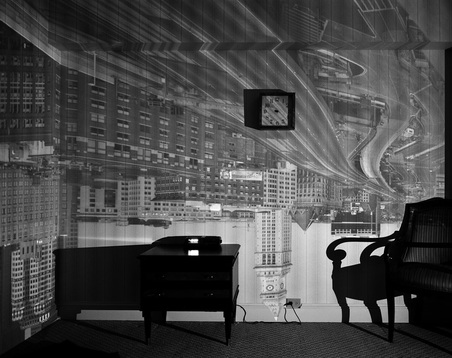

|
ABELARDO MORELL
Camera Obscura: Rooms with a View "I made my first picture using camera obscura techniques in my darkened living room in 1991. In setting up a room to make this kind of photograph, I cover all windows with black plastic in order to achieve total darkness. Then, I cut a small hole in the material I use to cover the windows. This opening allows an inverted image of the view outside to flood onto the back walls of the room. Typically then I focused my large-format camera on the incoming image on the wall then make a camera exposure on film. In the beginning, exposures took from five to ten hours. Over time, this project has taken me from my living room to all sorts of interiors around the world. One of the satisfactions I get from making this imagery comes from my seeing the weird and yet natural marriage of the inside and outside. A few years ago, in order to push the visual potential of this process, I began to use color film and positioned a lens over the hole in the window plastic in order to add to the overall sharpness and brightness of the incoming image. Now, I often use a prism to make the projection come in right side up. I have also been able to shorten my exposures considerably thanks to digital technology, which in turn makes it possible to capture more momentary light. I love the increased sense of reality that the outdoor has in these new works .The marriage of the outside and the inside is now made up of more equal partners." |
HOW TO DEVELOP A PINHOLE NEGATIVE:
GUIDELINES FOR SUCCESSFUL PINHOLE NEGATIVE:
You will use your handmade pinhole camera to produce at least one strong negative image. Requirements are below.
You will use your handmade pinhole camera to produce at least one strong negative image. Requirements are below.
- Photo should be in focus.
- Don’t hand-hold your camera.
- Photo should be properly exposed with good contrast.
- You should observe values ranging from light to dark.
- Your darkest shadow should be a very rich black.
- Your brightest highlight should be absolutely white.
- Photo should be properly developed with no chemical stains.
- Always agitate and follow the designated developing times.
- Photo should be carefully composed.
- Get close to your subject.
- Use unique angles.
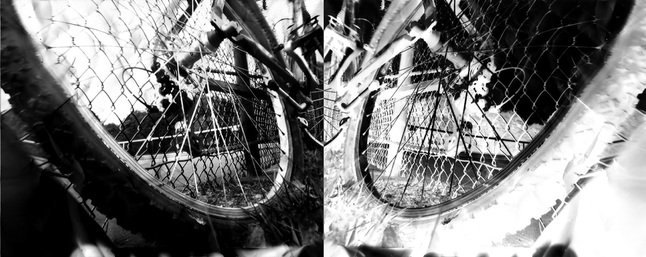
Week 3
TUE 9/20 - Artist in Residence: Abelardo Morell
THU 9/22 - 2 Pinhole Trials
THU 9/22 - 2 Pinhole Trials
Week 4
MON 9/26 - Final 2 Pinhole Trials
WED 9/28 - Pinhole Positives
REMINDER: ART GUILD MEETING TOMORROW!
WED 9/28 - Pinhole Positives
REMINDER: ART GUILD MEETING TOMORROW!
|
Pinhole Positive Pinhole Negative
|
Test Strip
(2 sec - 10 sec) 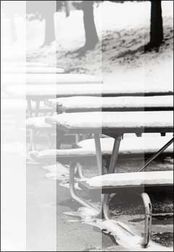
|
STEPS FOR MAKING A PINHOLE POSITIVE - Using the negative image you will make a contact print (exact same size as original)
- Turn on your enlarger using the timer button "focus."
- Raise the enlarger head so the light covers the baseboard and focus (outer edge should be sharp).
- Open the enlarger lens to the largest aperture (brightest setting), then stop down two clicks.
- Set the timer to 10 seconds, then turn off the enlarger using the "focus" button.
- Place your first test strip, emulsion side up, on the baseboard.
- Place your pinhole negative, face down, on top of your test strip.
- Place a clean sheet of glass over top of the negative and test strip.
- Using the "run" button, expose the image in 2 second intervals using a piece of cardboard to move across your test strip.
- Develop your test strip and evaluate the results in the classroom light (after fix) - wash, blow dry, and turn in (write name on back).
- Choose an exposure time, set your timer, and expose a second test strip (emulsion side up, negative face down, glass on top).
- Develop your test strip and evaluate the results in the classroom light (after fix) - wash, blow dry, and turn it in.
- Use a sheet of photo paper cut the same size as your negative and expose it to achieve a full range of values.
- Develop your pinhole positive, blow dry it and turn it in with a tape label including your name and block.
Week 5
TUE 10/4 - Final Pinhole Project Exhibit - All 4 images must be mounted and hanging on the wall with your name and year
THU 10/6 - Photogram Objects Due - ALL VALUES MUST BE REPRESENTED!
Photogram Test Strips #1-3 @ 1-5sec
BRING CAMERAS MON WED AND FRI NEXT WEEK!!
THU 10/6 - Photogram Objects Due - ALL VALUES MUST BE REPRESENTED!
Photogram Test Strips #1-3 @ 1-5sec
BRING CAMERAS MON WED AND FRI NEXT WEEK!!
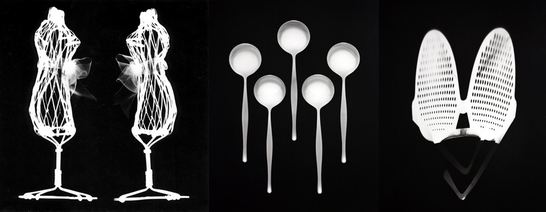
PHOTOGRAMS

|
|
Week 6
MON 10/10 - Photogram Test Strip #4 - Choose Average Time, Photogram Negative #1 - Create 1 composition (negative only)
BRING CAMERAS
Vocabulary Terms: Film Speed (ASA/ISO) = light sensitivity, Shutter Speed (sec) = exposure time, Aperture (f-stops) = size of lens opening
BRING CAMERAS
Vocabulary Terms: Film Speed (ASA/ISO) = light sensitivity, Shutter Speed (sec) = exposure time, Aperture (f-stops) = size of lens opening
|

|
WED 10/12 - Photogram #2-4 - Create 3 more compositions (negative only)
BRING CAMERAS
Vocabulary Terms: Light Meter = measure amount of light for correct exposure - Turn in notes to be graded with YOUR camera settings!!
BRING CAMERAS
Vocabulary Terms: Light Meter = measure amount of light for correct exposure - Turn in notes to be graded with YOUR camera settings!!
FRI 10/14 - Choose BEST composition to complete arrangement (2 identical positives and 2 identical negatives) - DUE TUESDAY!
BRING CAMERAS
Vocabulary Terms:
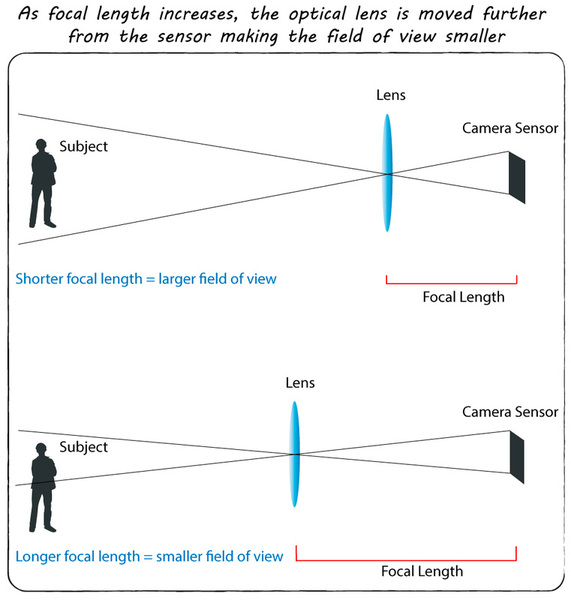
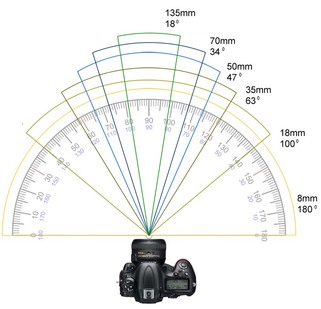
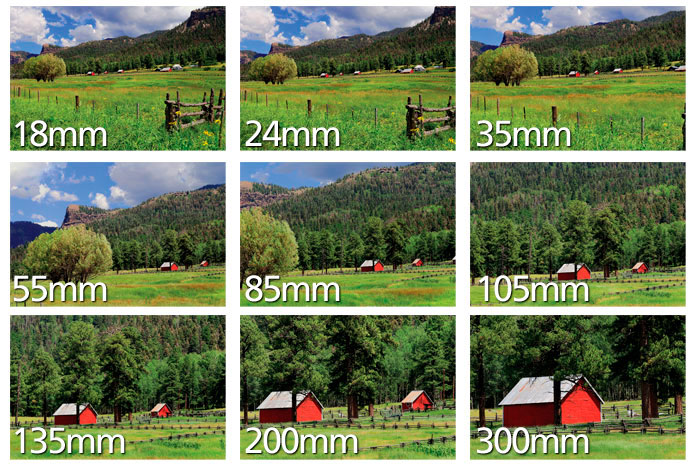
Focal Length (mm) - the distance between the lens and the point of focus (film)
BRING CAMERAS
Vocabulary Terms:
Focal Length (mm) - the distance between the lens and the point of focus (film)
|
|
Depth of Field - the range of distance that appears in sharp focus in the photograph
3 ways to change depth of field:
FOCAL LENGTH - long focal length (zoom lens) = shallow depth of field, short focal length (wide angle) = deep depth of field
SUBJECT DISTANCE close subject = shallow depth of field, farr subject = deep depth of field
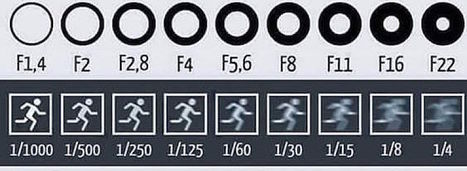
APERTURE SIZE - large aperture = shallow depth of field, smaller aperture = deep depth of field
3 ways to change depth of field:
FOCAL LENGTH - long focal length (zoom lens) = shallow depth of field, short focal length (wide angle) = deep depth of field
SUBJECT DISTANCE close subject = shallow depth of field, farr subject = deep depth of field
APERTURE SIZE - large aperture = shallow depth of field, smaller aperture = deep depth of field
Week 7
Equivalent Exposures: equal ratios of light
Wide Aperture + Fast Shutter Speed = Small Aperture + Slow Shutter Speed (NEVER SHOOT BELOW 60 OR CAMERA WILL SHAKE!!)
Example equivalents (practice outside):
Widest possible Aperture____________________ + ____________________Fastest Shutter Speed
Smallest possible Aperture____________________ + _________60__________Slowest Shutter Speed
Week 8
Develop Depth of Field film (Round 1) - Turn in Contact Sheet + Exposure Record w/ Outcomes
Week 9
Develop Depth of Field film (Round 2) - - Turn in Contact Sheet + Exposure Record w/ Outcomes
Complete Enlargement #1
Complete Enlargement #1
